

Learn the best techniques for Installing LVT Flooring, including vinyl plank flooring, with our comprehensive guide. Get expert advice on How to Install LVT Flooring installation for your next home improvement project.

Introduction
Are you considering upgradingyour flooring to luxurious vinyl tile (LVT)? Installing LVT flooring, especially vinyl plank flooring, is a fantastic way to enhance the aesthetics and functionality of your space. This guide will walk you through the process, providing expert tips and tricks for a successful installation.
Understanding How to Install LVT Flooring
Before diving into the installation process, let’s briefly discuss vinyl plank flooring and why it’s a popular choice for homeowners and businesses.
What is Vinyl Plank Flooring?
Vinyl plank flooring also known as LVT flooring, is a versatile and cost-effective alternative to traditional hardwood or tile flooring. It consists of individual planks made from PVC (polyvinyl chloride) with a realistic wood or stone appearance.
Pre-Installation Preparation
Proper preparation is critical to a successful LVT flooring installation. Follow these steps to ensure your space is ready for the process:
1. Gather Necessary Tools and Materials
Before you begin, make sure you have all the tools and materials required for the Installation. This includes:
Vinyl plank flooring
Underlayment (if needed) Tape measure
Utility knife
Spacers
Tapping block
Rubber mallet
Level
Adhesive (if applicable)
Transition strips
2. Prepare the Subfloor
Ensure that the subfloor is clean, dry, and level before installing LVT flooring. Remove any existing flooring materials and repair any imperfections in the subfloor.

Checking for Moisture
It’s essential to check for moisture in the subfloor, especially in areas prone to dampness, such as basements. Use a moisture meter to assess the moisture levels before proceeding with the Installation.
Installing Vinyl Plank Flooring
Now that you’ve prepared the
space, installing the vinyl plank flooring is time.
3. Acclimate the Flooring
Allow the vinyl plank flooring to acclimate to the room temperature for at least 48 hours before Installation. This helps prevent any expansion or contraction of the planks after Installation.
4. Plan the Layout
Carefully plan the flooring layout, considering the room’s dimensions and any obstacles, such as doorways or cabinets. Start the Installation from the longest wall, working towards the opposite wall.
Dry Fitting the Planks
Before applying adhesive (if using), dry fit the planks to ensure they fit correctly, and make any necessary adjustments.
5. Install the Underlayment (if applicable)
If your Installation requires an underlayment, lay it down according to the manufacturer’s instructions. The underlayment helps provide cushioning and sound absorption.

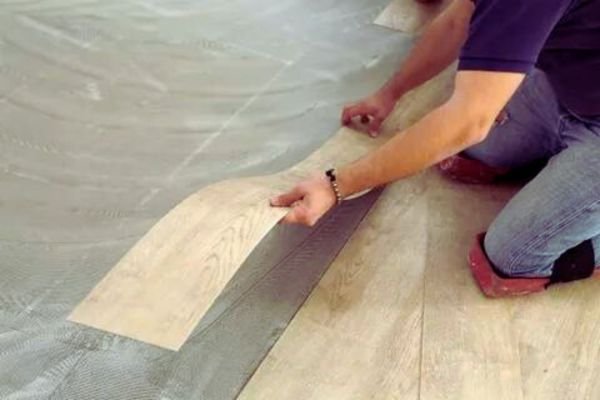
6. Begin Installation
Now, it’s time to start laying the vinyl plank flooring. Follow these steps:
– Start in the Corner
Begin laying the first plank in the corner of the room, leaving a small gap between the plank and the wall for expansion.
– Use Spacers
Insert spacers between the planks and the wall to maintain the expansion gap.
– Interlock the Planks
Continue laying the planks, interlocking the edges securely. Use a tapping block and rubber mallet to ensure a tight fit.
7. Trim the Planks
As you reach the end of each row, measure, and cut the planks to fit using a utility knife.
8. Install Transition Strips
Install transition strips in doorways or between rooms to create a seamless transition between different flooring types.
Tools and Materials
Gather all the necessary tools and materials for the Installation, including:
LVT flooring planks
Underlayment
Adhesive or click-lock system
Measuring tape
Utility knife
Straightedge
Spacers
Rubber mallet
Subfloor Preparation
Proper subfloor preparation is crucial for a successful LVT flooring installation. Ensure the subfloor is free of dust, debris, and moisture. Use a leveling compound to fill in any uneven areas and allow it to dry completely before proceeding with the Installation.
Laying the LVT Flooring
Begin by laying the underlayment, following the manufacturer’s instructions. Then, start laying the LVT flooring planks, staggering the seams for a natural look. Use spacers to maintain consistent spacing between planks and ensure a uniform installation.
Cutting and Fitting
As you reach the edges of the you’ll need to cut the LVT planks to fit room or obstacles like doorways. Measure carefully and use a utility knife or saw to make precise cuts. Remember to leave expansion gaps around the perimeter of the room to accommodate fluctuations in temperature and humidity.
Sealing and Finishing
Once all the planks are installed, remove the spacers and apply any necessary sealant or finishing products according to the manufacturer’s recommendations. Allow the flooring to cure completely before moving furniture back into the room.
Maintenance Tips
To keep your LVT flooring looking its best, follow these maintenance tips: Sweep or vacuum regularly to remove dirt and debris. Clean up spills promptly to prevent staining. Use felt pads on furniture legs to prevent scratches. Avoid using harsh chemicals or abrasive cleaners.
Transition Strips
If transitioning between rooms or different types of flooring, install transition strips to create a seamless
transition and protect the edges of the planks. Choose transition strips that match your LVT flooring for a cohesive look.
Finishing Touches
After Installation, reinstall any removed baseboards or trim and clean the floor. Use a damp mop and a mild cleaner to remove any dirt or debris, leaving your The new LVT flooring is sparkling clean and ready to enjoy.
Conclusion
Congratulations! You’ve successfully installed LVT flooring and transformed your space. With proper preparation and attention to detail, you can enjoy the beauty and durability ofvinyl plank flooring for years to come.
FAQs
Q1: Can I install LVT flooring over existing tile or hardwood floors?
Yes, you can install LVT flooring over most existing hard surfaces, as long as the surface is clean, dry, and level.
Q2: Do I need to hire a professional installer, or can I install LVT flooring myself?
With the right tools and preparation, DIY LVT flooring installation is feasible for many homeowners.
Q3: How do I clean and maintain LVT flooring?
Regular sweeping and occasional mopping with a mild cleaner is usually sufficient to keep LVT flooring looking its best. Avoid harsh chemicals and abrasive tools that could
damage the surface.
Q4: Can LVT flooring be installed in bathrooms or kitchens?
Yes, LVT flooring is water-resistant and suitable for moisture-prone areas like bathrooms and kitchens.
Q5: How long does LVT flooring typically last?
With proper care and
maintenance, LVT flooring can last upwards of 15-20 years, making it a durable and long-lasting flooring option for any home.